
How to Make Whipped Shea Butter at Home (Fluffy Body Butter Recipe)
Have you ever walked into a store, picked up that fluffy body butter, felt how luxurious it was, then saw the price tag and nearly fainted? ₦4,000, ₦5,000, sometimes even ₦7,000 for a small jar.
You put it back on the shelf thinking “maybe next time.” Meanwhile, your skin is crying out for deep moisture, especially during this brutal harmattan season.
Here’s what those expensive brands don’t want you to know: learning how to make whipped shea butter at home is incredibly easy. That cloud-like, fluffy body butter you’re lusting after? You can create it yourself in 20 minutes for less than ₦1,000.
I’m talking about real whipped shea butter that’s so fluffy it looks like vanilla frosting. Furthermore, it melts on your skin like butter and leaves you glowing for hours. Additionally, it’s so easy to make that you’ll wonder why you ever bought body butter in the first place.
As Nigeria’s leading cosmetic raw materials supplier serving over 5,000 beauty entrepreneurs, we’ve watched countless people master this recipe. In fact, many have built thriving businesses selling whipped body butter. Today, I’m sharing the exact method that creates that perfect, fluffy texture every time.
Whether you’re making it for yourself or starting a beauty business, this is your easiest path to luxury skincare at home. Let’s get started.
Today, I’m showing you exactly how to make whipped shea butter using simple, natural ingredients and a hand mixer.
What Makes Whipped Body Butter Different
Before we start whipping, let me explain what makes this different from regular shea butter or body cream.
Regular shea butter is solid at room temperature. Consequently, it can be hard to scoop out and difficult to spread, especially in air-conditioned rooms. Furthermore, it takes a while to melt on your skin.
Body cream is emulsified with water. Therefore, it’s lighter and spreads easily. However, it needs preservatives and emulsifiers to stay stable.
Whipped body butter is pure oils and butters that have been whipped with air. As a result, the texture transforms from hard and waxy to light and fluffy. Meanwhile, no water means no preservatives needed. Similarly, no emulsifiers mean simpler, more natural ingredients.
Why People Love Whipped Body Butter
Once you learn how to make whipped shea butter, you’ll never buy expensive store-bought versions again.
The fluffy, cloud-like texture is visually stunning. In fact, it looks like frosting, which makes your product appear expensive and professional.
The application experience is dramatically different from solid butter. Specifically, whipped butter glides on your skin effortlessly. Moreover, a little goes a long way because the air makes it expand.
Absorption happens faster than with regular shea butter. Particularly, the whipping process creates tiny air pockets that help the butter penetrate skin quickly. Consequently, you get all the benefits without the greasy feeling that solid shea butter sometimes leaves.
Using it feels luxurious every single time. Indeed, there’s something incredibly satisfying about dipping your fingers into fluffy butter. Furthermore, the texture makes your daily skincare routine feel like a spa treatment rather than a chore.
The moisturizing power is concentrated and long-lasting. Since pure butters and oils contain no water, you’re getting intense hydration. Therefore, your skin stays soft for hours, even in harsh harmattan winds.
What You’ll Need (Simple Ingredients)
This recipe makes about 250ml of whipped body butter, enough to fill two medium jars.
Before I show you how to make whipped shea butter, let’s gather everything you need for this easy recipe.
Base Ingredients:
- Natural Shea Butter (raw, unrefined) – 200g
- Coconut Oil (virgin, unrefined) – 50g
- Sweet Almond Oil (or Jojoba Oil) – 30g
- Vitamin E Oil – 1 teaspoon (preserves freshness)
Optional Add-ins:
- Essential oils for scent – 10-15 drops (lavender, vanilla, or rose)
- Arrowroot powder or cornstarch – 1-2 tablespoons (reduces greasiness)
Equipment:
- Hand mixer or stand mixer (essential for fluffy texture)
- Large mixing bowl
- Spatula
- Clean jars or containers for storage
- Measuring spoons
Total Cost: About ₦800-₦1,000 to make 250ml
Compare that to ₦4,000-₦6,000 for store-bought whipped butter. You’re saving at least 75%!
If you’re wondering where to get quality, unrefined Natural Shea Butter that whips beautifully into clouds, we stock premium ivory shea butter that creates that perfect fluffy texture every time.
How to Make Whipped Shea Butter: Step-by-Step Guide
This is your basic recipe. Follow these steps exactly for guaranteed fluffy results.
Step 1: Soften Your Shea Butter (5-10 minutes)
Take your shea butter out and break it into smaller chunks. Then, let it sit at room temperature until it’s soft but not melted. Think of the consistency of softened butter for baking.
Temperature check: Press your finger into it. If it gives easily but doesn’t melt, it’s perfect. On the other hand, if it’s rock hard, wait longer. However, if it’s completely liquid, you’ve gone too far.
Pro tip: In Lagos or Abuja heat, this happens quickly (15-20 minutes). Meanwhile, in air-conditioned spaces, it might take 30-40 minutes. Be patient because the right starting consistency makes all the difference.
Why Temperature Matters
Starting at the correct consistency is crucial for achieving fluffy texture. Specifically, if shea butter is too hard, your mixer will struggle and might not incorporate enough air. Conversely, if it’s too melted, the butter won’t hold air bubbles and you’ll end up with a smooth cream instead of fluffy clouds. Therefore, aim for that perfect soft-but-not-melted stage.
Step 2: Add Your Oils (1 minute)
Once your shea butter is soft, add your coconut oil and Sweet Almond Oil to the bowl.
If your coconut oil is solid, warm it gently until liquid. Then, pour it over the softened shea butter. Next, add the sweet almond oil as well.
Don’t mix yet. Just pour everything into the bowl together. We’ll combine them in the next step.
Why These Oils Work Together
Coconut oil adds extra moisture and helps create a lighter texture. Meanwhile, sweet almond oil contributes silkiness and helps the butter absorb faster without greasiness. Together, they balance the heavy richness of shea butter perfectly.
Step 3: Start Whipping (The Magic Happens Here!)
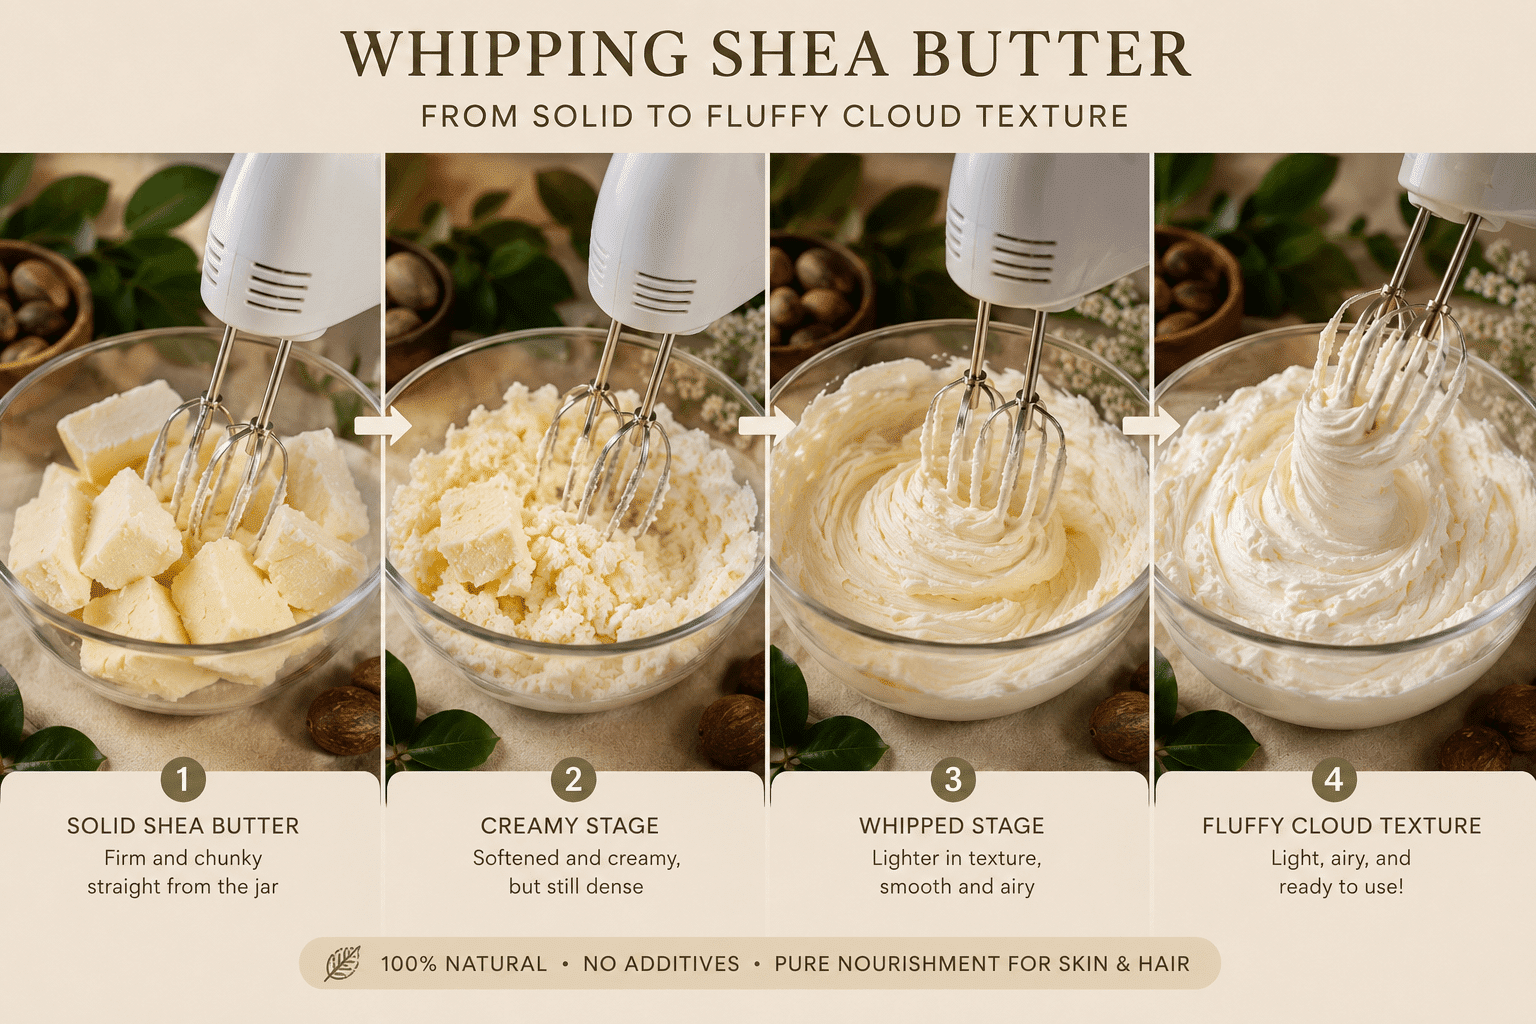
This is the most important part of how to make whipped shea butter – the whipping technique creates that signature fluffy texture.
What You’ll See During Whipping
0-2 minutes: The mixture looks lumpy and separated. Don’t worry because this is completely normal. Keep mixing consistently.
3-5 minutes: Everything starts coming together into a creamy consistency. The color lightens slightly at this stage. This is good progress, so continue whipping.
5-8 minutes: The texture transforms dramatically before your eyes. Specifically, it becomes fluffy, light, and almost doubles in volume. The color turns pale ivory or white, which indicates proper air incorporation.
8-10 minutes: Perfect! You now have cloud-like, fluffy body butter that holds soft peaks when you lift the mixer. Stop here because you’ve achieved the ideal texture.
Important Whipping Tips
Start on low speed for the first minute to avoid splattering butter everywhere. Then, increase to medium-high for optimal air incorporation.
Scrape down the sides of your bowl every 2-3 minutes. This ensures everything gets evenly whipped rather than leaving unmixed butter stuck to the sides.
If your mixture isn’t fluffing up after 8 minutes, check the temperature. Specifically, your shea butter might have been too cold. In that case, let it soften more and try again.
Don’t over-whip the mixture! After 12-15 minutes, you risk the butter becoming grainy rather than fluffy. Therefore, stop when you see those beautiful soft peaks forming.
The Secret to Cloud-Like Texture
Patience combined with proper speed creates the best results. Specifically, medium-high speed creates the best air incorporation without breaking down the butter’s structure. Additionally, whipping for the full 8-10 minutes ensures maximum fluffiness that looks professional.
Step 4: Add Final Touches (1 minute)
Once your butter is beautifully fluffy, add your vitamin E oil and essential oils if using.
Use your spatula to gently fold them in. Alternatively, give it a few more pulses with the mixer on low speed (10-15 seconds maximum).
Scent Suggestions
Lavender (10 drops) creates a calming effect that’s great for nighttime use.
Vanilla (8-10 drops) provides a sweet scent that’s universally loved by most people.
Rose (8 drops) gives a romantic, luxurious feel that’s perfect for gifts.
Peppermint (5 drops) offers a cooling, refreshing sensation that’s ideal for hot weather.
Mix: Combine 5 drops lavender with 5 drops vanilla for a spa-like scent experience.
Pro tip: Less is more with essential oils because you can always add more in your next batch. However, too much can irritate sensitive skin, so start conservatively.
Step 5: Transfer to Jars (2 minutes)
Use your spatula to scoop the whipped butter into clean, dry jars. Fill them generously because the butter is airy now but will settle slightly over the next few hours.
Presentation Tips for Professional Look
Use the back of a spoon to create swirls on top (like frosting a cake). This looks gorgeous if you’re gifting or selling your butter.
Don’t pack it down tightly into the jar. Instead, keep it fluffy and light to maintain that cloud-like appearance.
Wipe the rim of your jar clean before closing the lid. This small detail looks more professional and prevents lid sticking.
Container Choices
Wide-mouth jars are easiest to scoop from with your fingers or a spatula.
Pump bottles are convenient for everyday use, but butter needs to be slightly softer for pumping.
Tins are travel-friendly and give an artisanal, handmade appearance.
Step 6: Let It Set (30 minutes)
Leave your jars open at room temperature for about 30 minutes. This allows the butter to firm up slightly while maintaining its fluffy texture.
After 30 minutes, close the lids and store in a cool place. Your whipped shea butter is ready to use immediately!
What Proper Texture Feels Like
The butter should feel fluffy like whipped cream when you first scoop it. Then, it melts instantly on contact with warm skin. Finally, it absorbs within 2-3 minutes, leaving skin soft but not greasy.
Recipe Variation 1: Chocolate Whipped Body Butter
Want something that smells good enough to eat? Try this delicious-smelling version.
Ingredients: Use the basic recipe but make these changes:
- Replace 50g of shea butter with cocoa butter
- Add 1 tablespoon cocoa powder
- Skip essential oils (chocolate scent is enough!)
Method: Follow the exact same steps as the basic recipe. However, add the cocoa powder in Step 4 when you add vitamin E. Then, whip for an extra 1-2 minutes to fully incorporate the powder throughout.
Result: Rich chocolate scent that smells amazing, slightly firmer texture that holds up well, natural brown color that looks unique. Kids and chocolate lovers go crazy for this version!
Perfect for: Birthday gifts, selling at markets, or anyone who loves chocolate scents.
Recipe Variation 2: Rose & Honey Whipped Butter
This version is extra healing and smells absolutely divine.
Ingredients: Basic recipe plus:
- 1 tablespoon raw honey
- 10 drops rose essential oil (or rose fragrance oil)
- 1 teaspoon rose water (optional)
Method: Whip your basic ingredients as usual following all the steps. Then, in Step 4, add honey, rose oil, and rose water together. Fold in gently with a spatula. Note that honey makes the texture slightly less fluffy but adds significant healing properties.
Result: Light pink tint comes from the rose water, subtle rose scent that’s romantic, extra skin-healing benefits from the raw honey.
Perfect for: Mature skin types, very dry skin conditions, romantic gifts, or bridal showers.
Recipe Variation 3: Cooling Peppermint Body Butter
Great for hot weather or after-sun care on your skin.
Ingredients: Basic recipe plus:
- 15 drops peppermint essential oil
- 5 drops eucalyptus essential oil
- 1 tablespoon aloe vera gel (optional)
Method: Follow basic steps exactly as written. In Step 4, add peppermint and eucalyptus oils together. If using aloe vera gel, fold it in at the very end with just a few gentle stirs. Don’t over-mix because it can break down the fluffy texture.
Result: Cooling sensation on skin that feels refreshing, invigorating scent that wakes you up, perfect texture for hot Nigerian weather conditions.
Perfect for: After-gym use when muscles are tired, hot season relief during peak afternoon heat, or tired feet and legs at the end of the day.
Troubleshooting: When Things Don’t Go as Planned
Even simple recipes can have hiccups. Here’s how to fix common issues that might arise.
Problem: My butter won’t whip up fluffy
Why it happens: Shea butter was too cold or too melted when you started whipping.
How to fix it: If too cold, let it soften more at room temperature and try again. Alternatively, if too melted, put the bowl in the fridge for 10-15 minutes until it firms up slightly. Then, whip again and this time it should work perfectly.
Problem: My butter is grainy or gritty
Why it happens: Shea butter melted completely and re-solidified, or you over-whipped the mixture.
How to fix it: Remelt everything completely in a double boiler until fully liquid. Then, let it cool until just starting to solidify around the edges. Immediately begin whipping at that point. This process resets the crystalline structure of the shea butter.
Problem: My butter is too soft and won’t hold shape
Why it happens: Too much liquid oil in the recipe, or room temperature is too warm.
How to fix it: Add 1-2 tablespoons of arrowroot powder or cornstarch to the mixture. Whip again for 2 minutes to incorporate fully. This absorbs excess oil and firms the texture nicely. Alternatively, reduce coconut oil amount in your next batch.
Problem: My butter separated or looks curdled
Why it happens: Ingredients were at very different temperatures when you mixed them together.
How to fix it: Let everything come to the same temperature (room temp, slightly softened). Then, whip again from the beginning. It should come together smoothly this time.
Problem: My butter feels too greasy on skin
Why it happens: Too much oil in the recipe, or you’re applying too much product at once.
How to fix it: Add 1-2 tablespoons arrowroot powder and whip again thoroughly. This creates a drier, more powdery finish that absorbs better. Also, remember to use less product because a little whipped butter goes a long way on your skin.
Problem: My butter melted in storage
Why it happens: Stored in a place that’s too warm or got direct sunlight.
How to fix it: Shea butter naturally melts around 32-35°C, so storage location matters. Store in the coolest part of your home, away from windows and heat sources. If you live in a very hot area without AC, store in the fridge instead. The butter will firm up but still works fine when applied.
How to Use Whipped Shea Butter
Using whipped butter is simple, but here are tips for getting the best results from your homemade product.
For Daily Body Moisture
After your shower, while skin is still slightly damp, scoop a small amount (about a teaspoon for your whole body). First, rub between your palms to melt slightly. Then, massage onto your skin in circular motions, focusing on dry areas.
For Extra Dry Areas
Apply generously to elbows, knees, heels, and any rough patches you have. Then, let it sit for 5 minutes to fully absorb into the skin. These areas need extra love and attention with rich moisture.
As Night Treatment
Apply a thicker layer before bed for intensive overnight hydration. Your body heat helps it penetrate deeply while you sleep. Consequently, you’ll wake up with incredibly soft, smooth skin.
For Hands
Keep a small jar on your desk or bedside table for easy access. Apply after washing hands to prevent dryness and cracking, especially during harmattan season.
For Hair Ends
Rub a tiny amount between palms until melted. Then, smooth over dry hair ends gently. This seals in moisture effectively and prevents split ends from forming.
How Much to Use
Start with a small amount (about a grape-sized portion) and add more if needed. You can always add more product, but starting with too much leaves you feeling greasy and wastes your homemade butter.
Storage and Shelf Life
Proper storage keeps your whipped butter fresh and fluffy for many months.
How to Store Properly
Keep in a cool, dry place away from direct sunlight and heat sources. The bathroom is okay if it’s not too humid or hot throughout the day.
Close the lid tightly after each use to prevent contamination. This keeps the butter fresh longer and prevents it from absorbing odors.
Don’t introduce water into the jar under any circumstances. Always use clean, dry hands or a spatula to scoop out product. Water causes mold growth very quickly in butter.
Expected Shelf Life
Basic recipe (no water-based additions): Your butter will last 6-12 months when stored properly.
With vitamin E added: The butter lasts 8-12 months because vitamin E acts as a natural preservative.
With honey or aloe vera: These shorten shelf life slightly to 3-6 months due to water content.
Signs It’s Expired
Rancid smell that reminds you of old cooking oil indicates the oils have gone bad. Changed color such as yellowing or darkening means oxidation has occurred. Visible mold growth means throw away immediately and don’t use. Changed texture where the butter becomes oily or separates indicates breakdown.
Pro tip: Label your jars with the date you made them clearly. This helps you track freshness accurately, especially if you make multiple batches over time.
Packaging for Gifts or Selling
Beautiful packaging transforms your homemade product into something that looks professional.
Container Choices
Wide-mouth glass jars offer a classic, reusable, eco-friendly option that customers love.
Plastic jars provide a lightweight, travel-friendly, cheaper alternative for everyday use.
Metal tins give a vintage feel that looks durable with a premium appearance.
Labeling Essentials
Even for personal use, labels look professional and help you remember what’s inside each jar.
Include these details:
- Product name (“Whipped Shea Body Butter”)
- Scent or variety (if applicable to your batch)
- Key ingredients (Shea Butter, Coconut Oil, Sweet Almond Oil)
- Net weight (100g, 200g, etc.)
- Date made (month and year)
- “Keep in cool, dry place”
- Your name or brand (if selling)
Design Tips
Keep it simple and readable because fancy designs can look cluttered. Use Canva for free, beautiful label templates that look professional. Match colors to your butter type (brown labels for chocolate, pink for rose). Print on sticker paper or use clear tape over regular paper for waterproofing.
Gift Presentation
Tie a ribbon around the jar for a finished look. Add a small wooden spoon or spatula for convenience. Include a handwritten note with usage tips so they know how to use it. Package multiple scents together in a gift box for special occasions.
Pricing Guide (If You’re Selling)
Whipped body butter commands premium prices because of its luxury texture and appearance.
Cost Breakdown per 200ml Jar
- Shea butter (200g): ₦400
- Coconut oil (50g): ₦100
- Sweet almond oil (30g): ₦150
- Vitamin E & extras: ₦50
- Jar & label: ₦200
Total cost: ₦900 per jar
Recommended Retail Prices
Direct to friends and family: ₦2,500-₦3,000 per jar
Market or online sales: ₦3,500-₦4,500 per jar
Premium scents (rose, vanilla): ₦4,500-₦5,500 per jar
Bulk or wholesale (3+): ₦2,000-₦2,500 each
Profit Potential
Profit per jar: ₦1,600-₦4,600 depending on your positioning and sales channel
Scale example: Sell 40 jars per month at ₦4,000 each = ₦160,000 revenue. After costs, that’s ₦124,000 profit. That’s serious money for just a few hours of whipping butter!
Positioning Tips for Success
Emphasize the “handmade” and “natural” aspects in your marketing. Highlight the luxury texture using words like “cloud-like” and “fluffy” in descriptions. Use beautiful product photos that show the texture clearly. Offer sample sizes (50ml) to attract new customers and build trust. Create gift sets with multiple scents for holidays and special occasions.
Why Shea Butter is Perfect for Nigerian Skin
Let me tell you why this recipe works so well for us specifically.
According to dermatology research, shea butter contains vitamins A, E, and F that are essential for skin health.
Shea butter originates from West Africa, our region. Consequently, it’s perfectly suited for our skin type, climate, and unique needs. Our ancestors used it for centuries because it simply works better than imported alternatives.
For Melanin-Rich Skin Specifically
Shea butter helps even out skin tone gradually over time. Additionally, it reduces the appearance of dark spots with consistent use. Furthermore, it protects against sun damage with natural SPF properties. Moreover, it soothes inflammation that can lead to post-inflammatory hyperpigmentation.
For Nigerian Climate Conditions
The butter provides intense moisture without feeling heavy in humidity. Also, it protects skin during harsh harmattan winds that strip moisture. Additionally, it doesn’t melt too easily in moderate heat like petroleum-based products do. Finally, it creates a protective barrier against dust and pollution in urban areas.
The Vitamins in Shea Butter
Vitamin A repairs damaged skin cells and promotes healthy cell turnover for renewal.
Vitamin E protects against free radicals and premature aging from environmental damage.
Vitamin F (fatty acids) locks in moisture for hours, preventing transepidermal water loss.
When you use quality, unrefined shea butter, you’re getting all these benefits intact. In contrast, refined shea butter (white, odorless) has lost most of these healing properties during extensive processing.
Studies published in the Journal of Cosmetic Science show that shea butter effectively improves skin barrier function.
Your Whipped Butter Journey Starts This Weekend
Making your first batch of whipped shea butter is exciting and surprisingly easy. In just 20 minutes, you’ll create something that rivals ₦5,000 store-bought products in quality and appearance.
Start with the basic recipe to build your confidence. Master the whipping technique before getting fancy. Then, experiment with different scents and variations once you’re comfortable. Before you know it, friends will be begging you to make them jars. At that point, you might just have a profitable business on your hands!
This Weekend’s Action Steps
First, get your shea butter and oils because everything’s readily available.
Second, set aside 30 minutes (20 for making, 10 for cleanup).
Third, make your first fluffy batch following the steps carefully.
Fourth, apply it immediately and feel the amazing difference on your skin.
Finally, share your results with friends because people will be impressed!
The Nigerian women selling whipped body butter for ₦4,000-₦6,000 per jar? They started exactly where you are now, with a simple hand mixer and a dream to create something beautiful.
Ready to make luxury body butter at home? Get your quality ingredients:
- Natural Shea Butter (Ivory Color) – Whips into perfect clouds every time
- Sweet Almond Oil – Adds silkiness and fast absorption
- Coconut Oil – Extra moisture and lighter texture
Now you know exactly how to make whipped shea butter at home using this proven Nigerian recipe.
Questions about making whipped shea butter? Drop them in the comments below! Share your fluffy creations with us. Let’s whip up something beautiful together!